Guidance Please. Where to start and other Qs

Flooring Forum - DIY & Professional

Help Support Flooring Forum - DIY & Professional:

This site may earn a commission from merchant affiliate links, including eBay, Amazon, and others.

guysdigdirt

New Member
Joined
Jan 8, 2020
Messages
4
Location
Redlands, CA
I am going to float engineered wood over concrete on the first floor of our house. I will use 6 mil plastic under 1/4 inch cork under the 3/4 inch wood. I will glue all sides, leave the expansion gaps at walls and all "fixed" locations.

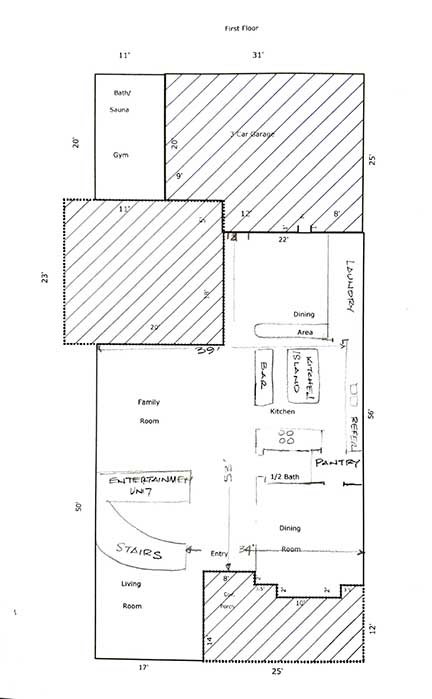
I am attaching a diagram of the floor. The shaded parts will not be done.

I will run lengthwise from to back of the house. The longest stretch is 53 feet, from front door to rear exit. the widest is 39 feet from family room to far side of kitchen.

My questions:

Where should I start? I do not really want to start in the middle of the floor, but can if that offers great enough advantages.

Must I put in expansion gaps here and there throughout the floor? I can see putting them in doorways, but do I need to put them anywhere else?


Any other guidance you can offer would be much appreciated.

l1ml5jT.jpg
 
What is the brand and style of product? Does the home set on flat ground or on top of a hill...... Curious about whether rain water flows towards the home or away from it. Is the house being lived in?
Do you know of any moisture issues with the slab?
 
Last edited:
Thank you for the reply.
Urban Floors, Cezanne, is the maker and product.
Rain runs away from the house.
House is being lived in.
I have already done the upstairs, stapled it down.
There are no moisture issues with the slab. I am actually putting the floor down over existing travertine that is in good condition. It would need to to be refinished but it in otherwise great condition.
 
I believe the tile is on a cement slab. It is flat and sound.
My biggest questions are; how to start straight and stay straight, do I need expansion gaps mid-floor or just where it comes to vertical items like walls?
 
I'd be tempted to start on the far left wall in the family room. Once you get past the entertainment system continue past the stairway as far as you can in a straight line. The only backwards part will be into the living room. Working on the slippery plastic will probably be a nightmare, especially so in the beginning stages.
 
That looks like some spendy wood. You are going to need ratchet straps, and a lot of them to keep the boards tight together. To begin straight, I would offset the first and second rows by about 50 percent of the plank length. I would also check the straightness of the planks on the first two or three rows. If there is a curvy plank, you wouldn't want it in the first rows.
 
I believe the tile is on a cement slab. It is flat and sound.
My biggest questions are; how to start straight and stay straight, do I need expansion gaps mid-floor or just where it comes to vertical items like walls?
Even on a cement slab, there should be something under the tile. That something, separates movement of the slab (cracks) from transferring to the tile. Some of those products can also stop or slow moisture from coming up from the concrete. Unless there is a good vapor barrier under the slab, moisture will always be present even if the floor is totally dry looking. No way to know how much moisture is passing through without actually testing it.
OK, all my ramblings have a purpose. You are installing a vapor barrier, sheet plastic. As you install the flooring, you will certainly get small cuts holes or perforations. Keep a roll of 2 inch wide handy and whenever you see damage, immediately patch it so you don't forget about it. All the seams need to be taped well also.
 
HighUp, thank you so much. I had no idea about the ratchet straps, they will make a huge difference. The living room in the front of the house is sunken, I already did it since it is separate. There are some small gaps that I notice when I go in now that it is done, family have said they do not see the gaps but I know they are there and hate it. These straps will make a huge difference, you are a lifesaver in my book.
The wood is a bit pricey but I got it on sale and it made the difference in being able to afford it or not so I snagged it. It has, so far, proven to have some warped pieces but been straight side to side. I will follow your instructions and choose the very straightest pieces to start the first two rows and will be sure to offset them by 50%.
The plastic is not too bad to work on, it is just me and I am very careful. I am running it up the wall a few inches and trimming it to the floor height after I am all done. I will keep the 2 inch tape handy and tape as soon as there is a tear or anything, thank you for that advice.
I have to say there is no way I could afford to do this at all if I had to pay a pro like you to do it, but now that I am doing so I can definitely see the value you guys bring to the table. Thank you for your help and time. I will bug you more if questions arise, then post some pictures when I am done so you can see what you helped me accomplish. Thank you again.
 
We are here to be bugged, so bug all you want. :nodding:. You have a really big area, so you will have a decent expense in those clamps and straps. You can buy additional strapping at many hardware stores.
If I have some photos, I will show how I use them.
Hey Ernesto, don't be so shy. ;)
 
Last edited:

Latest posts

Back
Top