


maymill
New Member
TOOLS AND MATERIALS REQUIRED
• Safety glasses and dust mask;
• Table Saw , Miter Saw
• Oscillating Saw or door jamb saw for door jambs;
• Vacuum , Pull bar, hammer and tapping block
• Wood moisture meter and humidity meter
• Recommended adhesive
• Glue scraper or clean damp cloth
• Brad nailer, Pin nailer, staple nailer or L cleat nailer
SUBFLOOR CONDITIONS AND INSPECTION
1./ STRUCTURALLY SOUND
Nail or screw down the subfloor (Plywood or OSB) if there are any loose areas; otherwise, hardwood that are nailed to the subfloor may squeak. it is recommended to install hardwood floor over plywood,OSB 3/4". Replace any water-damaged, swollen or delaminated subfloor/underlayment
2./ LEVEL AND FLAT
Avoid subfloors with excessive vertical movement. Using straight edge or level, check to ensure the subfloors is within 3/16" in 10' Radius or 1/8" in 6' radius. Use a cement leveling compound that has strength no lower than 3000 PSI to pacth/fill any low areas. Use Egde Sander with 16 Grit to sand any high spot areas
Note: Follow cement leveling compound manufacturer's instuction to avoid overfill in deep voids.
3./ CLEAN
Inspect to ensure the subfloor is free of any imperfections. Vacuum thoroughly to make sure there is no wax, paint spills, oil, debris or anything that could impede adhesion to the subfloor.
4./ DRY
Conduct appropriate moisture test from several different areas of the subfloors and record readings. Subfloor moiture content must not exceed 10% for Plywood/OSB.
SUBFLOORS
PREPARATION
IMPORTANT:
Make sure each fastener is placed in exactly the right spot.
Install planks parallel to exterior wall, which is usually the longest and straights. Allow 1/4" expansion space, and snap a chalk line parallel to the wall. For example, for hardwood plank 5" add 1/4" and snap a chalk line 5 1/4" from exterior wall.
STEP 2: INSTALLING THE FLOOR
• Safety glasses and dust mask;
• Table Saw , Miter Saw
• Oscillating Saw or door jamb saw for door jambs;
• Vacuum , Pull bar, hammer and tapping block
• Wood moisture meter and humidity meter
• Recommended adhesive
• Glue scraper or clean damp cloth
• Brad nailer, Pin nailer, staple nailer or L cleat nailer
SUBFLOOR CONDITIONS AND INSPECTION
1./ STRUCTURALLY SOUND
Nail or screw down the subfloor (Plywood or OSB) if there are any loose areas; otherwise, hardwood that are nailed to the subfloor may squeak. it is recommended to install hardwood floor over plywood,OSB 3/4". Replace any water-damaged, swollen or delaminated subfloor/underlayment
2./ LEVEL AND FLAT
Avoid subfloors with excessive vertical movement. Using straight edge or level, check to ensure the subfloors is within 3/16" in 10' Radius or 1/8" in 6' radius. Use a cement leveling compound that has strength no lower than 3000 PSI to pacth/fill any low areas. Use Egde Sander with 16 Grit to sand any high spot areas
Note: Follow cement leveling compound manufacturer's instuction to avoid overfill in deep voids.
3./ CLEAN
Inspect to ensure the subfloor is free of any imperfections. Vacuum thoroughly to make sure there is no wax, paint spills, oil, debris or anything that could impede adhesion to the subfloor.
4./ DRY
Conduct appropriate moisture test from several different areas of the subfloors and record readings. Subfloor moiture content must not exceed 10% for Plywood/OSB.
SUBFLOORS
- Plywood: 3/4" CDX Plywood subfloor is preferred. but minimum thickness of 5/8" is required
- OSB: 3/4" OSB panel is required. Install hardwood at 90 Degree angle to joists only
PREPARATION
- Remove existing carpet, baseboards, moldings (if applicable), wall base, and thresholds.
- Undercut all door castings with oscillating tool using a scrap piece of floor plank as a guide. Ensure doors can still open and close after installing the floor.
- When installing wood floor with natural variations, be sure to blend the planks from several cartons to ensure a good mixture of grain and shading throughout the install.
IMPORTANT:
- For planks wider than 5", we strongly recommend gluing the bottom and ends of the plank with adhesive, in a " S " pattern, prior to stapling the flooring down
- It is recommended to run hardwood planks perpendicular to the joist (at 90 Degree)
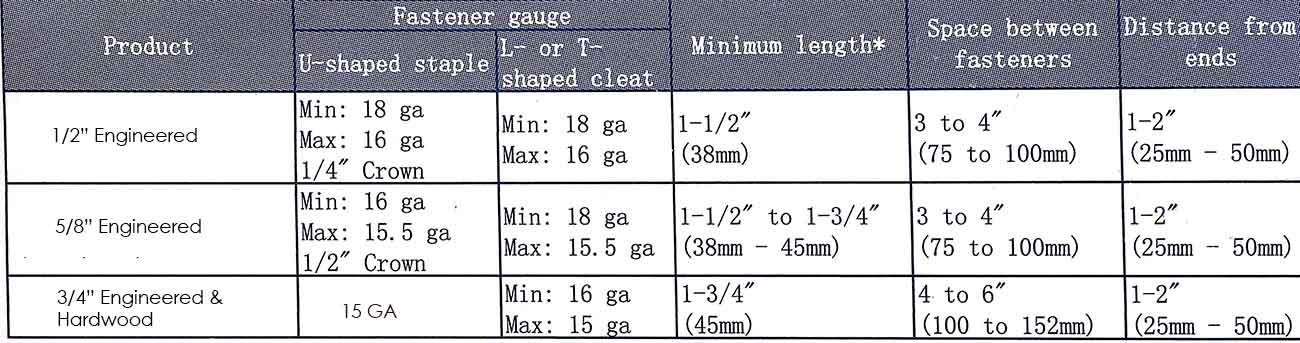
- Here is recommend to fastener shecdule for staple and L cleat:
Make sure each fastener is placed in exactly the right spot.
- Fasteners should not be driven in at a 45 Degree angle
- Fasteners heads should be possitioned in the provided slot in the board
- Fasteners should not be driven too deep into the tongue and should not interfere with board positioning on the next row.
Install planks parallel to exterior wall, which is usually the longest and straights. Allow 1/4" expansion space, and snap a chalk line parallel to the wall. For example, for hardwood plank 5" add 1/4" and snap a chalk line 5 1/4" from exterior wall.
STEP 2: INSTALLING THE FLOOR
- Place the tongue side on chalk line and the groove side facing the exterior wall. Ensure the first row exactly align with the chalk line.
- Blind nail on 45 degree into plank's tongue at every 4" interval. Complete the entire first row along the chalk line. And second row of blind nails is required. Do not face nail on second row. When clearance allows, use stapler/fastener.
- For easier of installation, work left to right. Distribute lengths, avoiding "H" patterns. Stagger end joists of boards row to row a minimum of 6" for strip flooring. 8 - 10" for 3 - 5" Plank. 10" for wider than 5".
- Install each succeeding row of planks by stapling/fastening the tongue side every 4 - 6" to within 2" from board ends
- Upon reaching the last row to be installed, the planks should be ripped to allow a 1/4" expansion space.
- Last 2 - 3 rows need to be glue on subfloor, glue into the groove and blind nails. last row should be shim + pin nailer face nail. and wait untill glue dry to remove the shim.
- Use the putty or a non sillicone based filler to cover small nail holes. Test filler in spare pieces first to ensure it blends with the floor.
- Clean and vacuum the floor using the soft brush attachment.
- Clean any glue on surface. For wood glue using damp clothes with warm water to clean the glue
- Final inspection by the end user should be conducted from a standing position
Last edited:
