What did you do today?

Flooring Forum - DIY & Professional

Help Support Flooring Forum - DIY & Professional:

This site may earn a commission from merchant affiliate links, including eBay, Amazon, and others.
Starting from the bare joists, it would be nice to see at the very least 1/2" on 16" centers would work, but I'd go at least to 5/8". 1/2 inch is skating on thin ice. 3/4" T&G would be way better. Thicker is always better. If the joists are wider than 16 on center, you need even thicker material.
Lay the subfloor perpendicular to the joists... that's really important for strength because the plywood has one more layer in length than width. That makes the plywood much more rigid if it's installed correctly.
Imagine the plywood grain as one of those exterior roll up bamboo window or deck shades. Another example might be a mini-blind for windows.
Imagine unrolling the bamboo shade or laying the mini-blind over the bare floor joists........... lay it parallel, them lay it perpendicular to the joists.
One way it lays over the joists like a limp blanket and layed the other way the shades will lay perfectly flat. That additional layer of veneer adds a lot of strength.
As for the underlayment... the thicker/stronger the subfloor is the thinner the underlayment could be. 5/8" subfloor and 3/8" underlayment would work. With 3/4" or thicker subfloor and 1/4" underlayment would work.
I suppose knowing the joist spacing is first on the list.
Thanks for explaining that. I thought I read somewhere (I could be wrong) that 24" on center was common for spacing and that if it was more than that, it would require thicker. I'm trying to remember my math. Both 5/8+3/8 and 3/4+1/4 equal 1 inch, right? I'd love to do tongue and groove if I could find it. I'm thinking 3/4" might be easier for me to manage than 5/8" because of the weight, but ultimately it depends on what is available in the store. I really hope they have tongue and groove for a reasonable price.

Just eyeballing it, I *think* the joists are 24" apart, but I'd really have to get under there and measure-- when I get my measuring tape back from my friend. He's borrowing a lot of my tools right now. Once the weather clears up and he's set with his place, he's going to help me with fixing this place up.

Should I do pressure treated for both layers or could I get the bottom layer pressure treated and top layer untreated? (Ideally, I'd like pressure treated for both).

I'm also considering just trying to find a way to rip up the luan I put the self-leveling stuff on and seeing if I can use it for a template for another piece and redo it. It might be easier in the long run than trying to smooth that crap out-- but the mixture covers most of the screws and I can't find my grinder.

Wish that garage sale with all the tools had been around here. That would have been awesome. I do like to go to flea markets though. Found some decent stuff at flea markets before. I got a chest of drawers made of solid wood at one of them. I hate particle board stuff.

Editing to add that 16" on center makes sense now when I read the boards are usually about 8'x4'. It would work for the 8' runs-- but it looks like I have 24 instead. Although, I could always add extra supports under the laundry area and tub. I'm hoping the existing joists will be in good shape, but I will probably need to to do something to make the floor level-- at least in the tub area.
 
Last edited:
This is probably more than you asked for, but it's good info. I'm gonna save this one. Lots of good info for ya.
For 24" on center, 3/4 or thicker.
http://www.pfsteco.com/techtips/pdf/plywooddesignapplicationguide
I wouldn't use pressure treated for anything that is going to have vinyl over it. I'm not sure if it's safe for indoor use either. I'd contact the manufacture of the plywood and ask them what the preservative is and if it will stain the vinyl. Maybe there is a treatment that's safe for both indoor use and won't stain the vinyl over time. I just don't know about that sort of stuff because it's never used where I live.


Thanks! I think pressure treated is used indoors a LOT around here because the climate is so damn humid. I read that it can be used for anything but countertops and cutting boards.
http://www.prowoodlumber.com/en/blog/2010/march/is-pressure-treated-wood-safe-for-indoor-use.aspx

My friend was pricing out materials to fix up his bathroom. He was looking for cementboard and drywall. I mentioned there's Greenboard (which apparently now comes in purple) so he asked for the price on that. My mother is offering to pay for stuff for him and he plans to help us out bigtime in return-- I believe he said something about if any of us ever needed a kidney.... LOL.

He just rescued a kitten from the storm so I got some food for it and held it. Adorable sweet little kitty. Moved some of his furniture from his grandparents' house. Got the computer, desk, two chairs (one of them is a powered recliner), and an electric fireplace looking heater thingy. Took two trips. His girlfriend discovered that I used to do therapeutic massage as a hobby (on family and friends-- although I once helped my boss with his shoulder) so she's been asking for back massages.

My friend's daughter who is about 5 now was visiting the grandparents and was very excited to see me. She ran up and jumped on me and then lifted her legs off the ground to hang from me. When I was sitting on the couch she pounced on me and discovered that she bounced when she bumped in to my chest so she started bouncing herself off of me until her great grandmother realized what she was doing and started yelling at her. I was just laughing too hard about it to care.

Meanwhile, the guy we sold the tractor to came by this morning (well, technically yesterday morning since it's after midnight) and cut the weeds back. When he came to bush hog a few days ago he killed two snakes and he was worried about us getting bitten if snakes were hiding in the weeds near the truck and porch. He really is a sweet man. He's always helping people out. One day I'll have to send him a thank you card.

Went from looking like this:
tumblr_ovl5i9U27c1qkwd9ao1_1280.jpg


To this:
tumblr_ovl5i9U27c1qkwd9ao2_1280.jpg


He was armed only with a weed eater and a machete. And that "pig grass" (really tall weeds with thick bases) are tough. My machete mostly bounced off of them. He probably would have gotten more done but it started raining.
 
Last edited:
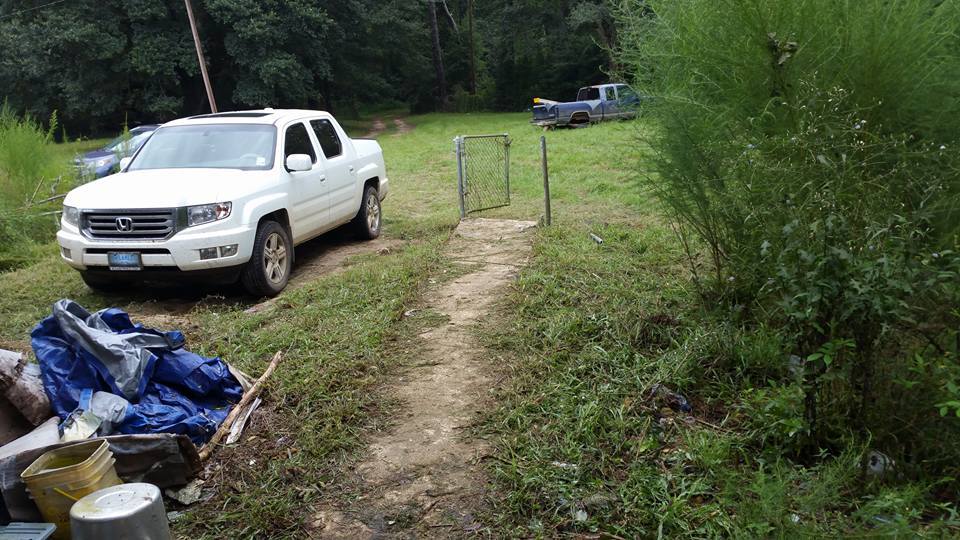
....and someone left the gate open. :eek:
who let the dogs out............ :D

LOL! The area where the white truck is parked used to be fenced in, but when part of the 400-year-old oak tree fell, it took out that chainlink fence but managed to leave the gate.

It also landed on our first CR-V and I literally said "Dude, where's my car?" when I went outside and couldn't see it. Completely buried under tree.
 
This afternoon, I cut about 7 or 8 linear feet of 1/4" aluminum plate in my table saw as a starting point to build a router lift for my new router. Now I have 4 rectangular pieces. Part 1 makes the table insert, the part you see mounted into the table top.
Pieces 2 and 3 will make the router holder and movable elevation parts. Piece number four will be have 4 threaded rods that will connect to the top piece. The threaded rods serve as guides for the elevator part holding the router. If all works out as planned, I'll be able to adjust the router bit up and down in very tiny increments if needed. My brain has been hurting lately from all the design work. There are commercial lifts, but they are usually for larger routers, like 3 1/2 hp models and are spendy. The DIY models I see on the internet are made out of wood. That seems silly because I'd think wood guides will swell and shrink throughout the year. I've got about $45 invested in the aluminum plate material and a tad less in the rest of the parts......... so far. Hope this sucker works when I get it finished. :D
 
Last edited:
What kind of blade are you using?

:camping:

Daris
A 40 tooth carbide combo blade... Metal cutting blade is $60 and a regular carbide blade is...
...oh wait, I already had one on the saw. :D
I used the heavy blade instead of a thin kerf figuring it could make straighter cuts. Aluminum cuts like frozen butter. Just went slow and easy.
I made a sammich with plywood screwed to my wooden saw table. I raised the saw blade up through the plywood. That protected the table and also stopped vibration and noise a little bit.
Next, I adjusted the blade upwards another 3/8" so I'm cutting 1/4" plate with 3/8" blade height above my base plywood level.
I used another smaller scrap sheet of plywood on top
of the aluminum........ with that 3/8" cut height, the blade can't protrude through the top layer of my sammich. That top sheet of plywood stops chips from flying in your face. Still, you MUST wear eye protection because metal shavings are a lot sharper than sawdust. ;)
I also soaked the metal on both sides and the plywood cover sheet with with WD-40 before running it through the saw. I lubed the fence with WD-40 too.
I also put a 10X12 sheet of painters plastic and a 6 by 8 foot carpet scrap under the saw to contain most of the shrapnel. It did a really good job.
The cuts are as accurate as cutting wood but you can see the blade rotation marks in it 'cause it's shiny. It makes for a nearly machined edge on the aluminum with only some minor bur filing required afterwards.
Now I'm onto getting the pieces lined up and temporarily fastened together so I can drill through all the pieces at the same time for accuracy. I need super duper accuracy so that all 4 threaded rods used to line up the elevator are perfectly parallel. The elevator thingy holds the router and allows it to move straight up and down with zero horizontal wobble.
My ideas are morphing slightly as I proceed, but the basic design is the same.
I'm gaining, but very slow in committing to each step so I don't screw anything up.
 
Last edited:
Safety alert with the aluminum plate cutting.
I mentioned screwing a piece of 1/2" plywood to my wood saw table, then raising the saw blade 3/8 of an inch up through a scrap of plywood. Mainly to dampen the noise control the shavings, but also so I could soak the plywood with WD-40 to keep the blade lubed.

That worked fine for cutting a 12" wide piece off of a 22" wide sheet of aluminum.
I discovered that with last nights plate cuttings, that one side of my table saw fence was out of square with the table.
I decided to re-cut the main 9x12 piece of metal that was out of square. I wanted to trim off about 1/8 of an inch of material. ...same width as my blade.
As a reminder, I ran my saw blade up through a piece of scrap plywood thus creating a zero gap in my blade and work surface.
...not so swift an idea.
Events slowly went awry :eek:
Ya see, cutting off this narrow 1/8" strip, the saw blade of course created a slight downward burr, which slowly dug into the plywood near the blade and steered my 1/4" aluminum away from the fence and into the blade.
I stopped pushing on the piece and held the metal plate firmly down against the table and unplugged the extension cord to my saw using my feet. I mean........ it's not like I could just let go of the metal as it was binding.
I wasn't in any danger. I was standing to the side of my fence. Worst case scenario might have been launching the 9" by 12" section of metal a few feet behind the saw. I had a plywood cap over that sheet of aluminum to eliminate the shrapnel from flying all over my face. Had I let loose of the metal and it had bound against the fence and stopped the blade, I suppose the saw motor could have been damaged from seizing.
I ended up re cutting a second time. another 1/8 inch. ......and this time I left a 1/8 gap between the blade and the plywood to prevent that small bur from digging into the plywood like before. I also proceeded three inches forward, then carefully backed the aluminum sheet out of the cut to re-spray the blade with WD-40. (blade still moving) then forward 3 inches, then slowly backed out again, re-sprayed the blade and finished the last 3 inches of the 9 inch cut.
From what I learned, is that backing out of a cut with this aluminum sheet is at least as safe if not safer than doing it with some 3/4" plywood. Just hold the piece steady against the fence as you push and keep everything doused with WD-40..... the blade, the fence and the table top surface so the metal slides easily.
I may do an MS Paint drawing to show the procedure more clearly.
So anyhow, I got's all 4 rectangles of aluminum (aluminium for you Jon) :D cut and stacked together and ready for marking the layout of the contraption.
With luck it won't look too much like a '"contraption" but more like a tool.
 
Last edited:
You sided you house, well I got up and unloaded the spruce needles that filled my gutters. Watched the weather forecast for our first 'heavy' rains since June and decided it was time to getter done. Well, glad I gotter done. Had a 1/2 inch in an hour or so and I can't believe with a steady down pour like that can do as a first rain of the season, so to speak............ lot's a crap littered the roads, nobody died in the downpour, so that's good. :D
The weeks before were hot weather and now we got smacked back to reality............ Fall is a comin'
We still have the potential for another month of summer like weather as Fall sets in. I'm not quite ready for the rain.

...............Oh yeah! What did I do today? ..........a restretch. I'll finish what I started tomorrow.
Manufactured home built in 07. Original carpet, open layout. Carpet seams are 13' 6" so I know it's some original carpet. Decent stuff being factory material. 10 years old and I bet is has another 5 good years. The home has new owners and no furniture moved in there yet............ a very good thing considering the layout and the re-stretching needs of this place.
With most all of the-stretches I see, they only require re-stretching the width.............. the lengths usually tighten up when you stretch the width. Not this one. 3BR , a short L-shaped hallway, a study with angled french doors and a 14 by 30 foot living room.
Carpet is loose in width and length, so it's lot of stretching every which way so the doorways and heater vents don't get so tweaked out that it cause even more issues. So far, by stretching all 4 directions in small amounts, I've only re cut one doorway seam.
It seems like you work more re stretching carpet than installing since you can't just stretch and trim............... you have to stretch and plan so stuff ends up where you want it to be. You don't have much room for error especially when there are no carpet remnants available. The MBR and the study with the french doors are both completed, and the living room is stretched one way in length and one stretch in width.......... the hard parts and thinkin' are done did. Tomorrow ought to be an easier day. I might just be stretching and trimming with no seams to re- do. 5 doorways needed new metal........ 2 of them done.
Makes for a lazy Friday I guess. Nice people to work for so that makes it even better.
 
Last edited:
I'm working........... 3 miles from a golf course. My job is 1/2 mile from the beach too, so you know where I won't be going after work. ;)
My reasoning is two fold. Beaches are free. The summer golf rates would cost me $325 for a round as a "day guest"......... That's twice what I'm making today.
If however, I stay at a 4 room cottage at the resort, ($1,900/day), then I'll only have to pay $275. HUGE savings. :D
On the bright side, the higher summer rates end in a week and a half ......but I'll still be goin' to the beach. I don't golf anyway. I mean, don't even know which end of the bat to hold. :D
 
Last edited:
Since the world did not end on Sept. 23, the new ending date is scheduled for Oct. 15. Get some popcorn and grab a seat. Earth is supposed to collide with a planet that does not exist. Neat trick, but if anyone can do it, Earth can.:shooting:
 

Latest posts

Back
Top