I have 3 Craftsman, I bought one for me, one for my helper and one for my shop. And most of the time, I still can't find one.Is it an Estwing? I had one and it killed me with the vibtation. Threw it out in a field somewhere where I was working. Got a
craftsmen and never turned back.
You are using an out of date browser. It may not display this or other websites correctly.
You should upgrade or use an alternative browser.
You should upgrade or use an alternative browser.
What did you do today?
- Thread starter havasu
- Start date


Help Support Flooring Forum - DIY & Professional:
This site may earn a commission from merchant affiliate
links, including eBay, Amazon, and others.
Yup. My brother has one too. His handle has a harder rubber handle than mine... Not much, but noticeable.Is it an Estwing? I had one and it killed me with the vibtation. Threw it out in a field somewhere where I was working. Got a
craftsmen and never turned back.
Got my job done tonight. Got fed burgers afterwords.
Turned out great, but I am whooped. Over felt pad, stretching is harder, so because the room I over 30 feet long, I stretched the first 1/3 of the length and stay tacked it. Later, I stretched it another 1/3 of the way to move the wrinkle that formed ahead of the first stay tacks.
Then I finished to the far wall.
The owner wasn't home. I figured she'd freak out seeing this.
Attachments

Hardest part was the stretching sequence and keeping the lines straight on so many walls plus the zbar at a 5 foot and 8 foot doorway.
I wanted this stretched tight and even...... because I don't want it to ever need restretching. The 1x4 baseboards are being installed tomorrow, along with the two glass, four foot pocket doors. The 8 foot opening for the pocket doors will also be trimmed out on top of the carpet. A restretch would mean removing ,,1/2 of the baseboards and door trim.
......not to mention the furniture, book cases, pool table etc. Turned out super nice, especially the seams.
She picked out a heavy duty nylon Queen carpet. Backing was a bit stiff, but one of the best I have seen in a long time. Old style action back with plenty of nice quality adhesive.
Attachments


Nice job. Don't think I would have the patience.
Me neither.
Been stressing over this job for a long time. Heading down to the job in a while to pick up the garbage and a couple of 4 by 4s. I took my 8 and 12 footers to span the closet and the pocket door openings. I wedged in 2x4 and plywood blocking inside the pocket door cavities so that I could stretch off of them. I stretched pretty hard and I'd get murdered by the contractors if I collapsed something inside those cavities.
I just remembered something I forgot to pull my blocking out when we left last night but the contractors are there installing base right now and I think they're smart enough to figure that out. Maybe.
What do you think of this?

Need to have a manniquin with it head sticking out looking up to feak people out.
....no, laying at the bottom of the shaft.Need to have a manniquin with it head sticking out looking up to feak people out.
Highup, I hate having to fix other people's screwups, but it happens all the time. I feel for you bc I have so much wrong to fix with my own house. Looks like you did a great job though!
As to the glass floor, not only NO. but HELL NO! I have the kind of luck that something would give & the glass would break.
For some reason it made me think of a prank they pulled in China (I think it was China) on a glass bridge over a canyon. They had TV screens underneath & hidden speakers. When people walked over some spots the TVs made it look like the glass was cracking & there were cracking noises. People walking across would grab the rails, some ran in a panic & the cracks followed them. One guy jumped up on the rails & nearly fell over into the canyon but people grabbed him in time.
My body was being hateful today so I didn't do much but I did fix & update some of my sketches for the guest bathroom.
Original sketch followed by the fix-- fixed perspective on the tub.


This is the updated version with the mirror that came with the vanity, 2 bulb light like the one we purchased, added tp holder & shelves, drew in correct shape of the toilet tank & removed side shelves from space saver bc realistically there won't be enough space... The medicine cabinet above the vanity in the first pic will instead go on the opposite wall & I'll set up a shaving station for my brother so his beard hair won't go in the sink.
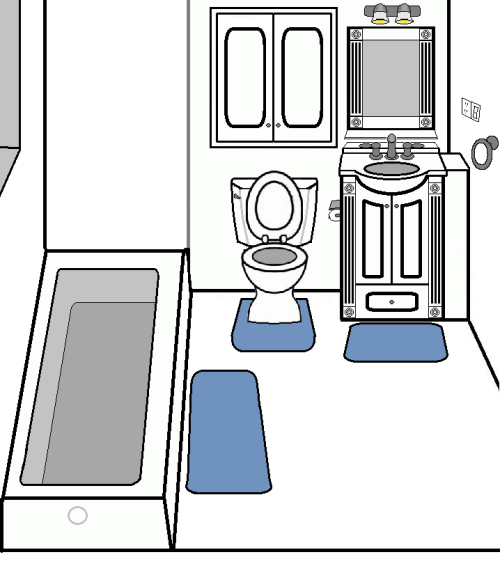
I wish I was good enough with my drawing to get paid for it. LOL. I really do enjoy it.
As to the glass floor, not only NO. but HELL NO! I have the kind of luck that something would give & the glass would break.
For some reason it made me think of a prank they pulled in China (I think it was China) on a glass bridge over a canyon. They had TV screens underneath & hidden speakers. When people walked over some spots the TVs made it look like the glass was cracking & there were cracking noises. People walking across would grab the rails, some ran in a panic & the cracks followed them. One guy jumped up on the rails & nearly fell over into the canyon but people grabbed him in time.
My body was being hateful today so I didn't do much but I did fix & update some of my sketches for the guest bathroom.
Original sketch followed by the fix-- fixed perspective on the tub.
This is the updated version with the mirror that came with the vanity, 2 bulb light like the one we purchased, added tp holder & shelves, drew in correct shape of the toilet tank & removed side shelves from space saver bc realistically there won't be enough space... The medicine cabinet above the vanity in the first pic will instead go on the opposite wall & I'll set up a shaving station for my brother so his beard hair won't go in the sink.
I wish I was good enough with my drawing to get paid for it. LOL. I really do enjoy it.
Thats pretty good. Is that done using SketchUp or do you have another program?
Cut up a tree with a chainsaw. Rough job for an old man.
Highup, I used MSPaint. Drew everything out using line & shape tools. There is a curved line tool where you can set point A and point B and then grab it somewhere to make it curve that I used for some parts. It will probably be a tighter squeeze than it looks in the drawing though. We don't have the space saver yet so that is something that will change.
I watched some videos by a guy from Bourbon Moth Woodworking. He showed how to make cabinet carcasses, drawers, & doors. He's entertaining as well as informative. He showed how to cut dados using just a table saw without a dado stack, which is something I found useful. If the lumber is cheaper than buying a pre-built cabinet, I may try to make my own space saver.
Rusty, at least you can start a chainsaw. I've always had trouble with anything that uses a pull cord. I have short arms & when I had to start a lawnmower, I would have to push the lawnmower forward with my foot to get a long enough pull & always had to try several times to get it going. I don't think I could even hold the weight of a chainsaw while cutting- I've gotten that weak. My strength was always in my legs. I could leg press about 250lbs & I could do curls & bench presses back in high school before I had my first heart attack (I was still in high school when I had my 1st one).
Those TV shows where they show people cutting up trees make it look so much easier than it actually is. Oak is particularly tough to cut.
Wish some of you guys were out in my area to get lumber from the trees that fell. Couple of decent sized oaks toppled over. So much wood going to waste.

Highup, I used MSPaint. Drew everything out using line & shape tools. There is a curved line tool where you can set point A and point B and then grab it somewhere to make it curve that I used for some parts. It will probably be a tighter squeeze than it looks in the drawing though. We don't have the space saver yet so that is something that will change.
I watched some videos by a guy from Bourbon Moth Woodworking. He showed how to make cabinet carcasses, drawers, & doors. He's entertaining as well as informative. He showed how to cut dados using just a table saw without a dado stack, which is something I found useful. If the lumber is cheaper than buying a pre-built cabinet, I may try to make my own space saver.
Rusty, at least you can start a chainsaw. I've always had trouble with anything that uses a pull cord. I have short arms & when I had to start a lawnmower, I would have to push the lawnmower forward with my foot to get a long enough pull & always had to try several times to get it going. I don't think I could even hold the weight of a chainsaw while cutting- I've gotten that weak. My strength was always in my legs. I could leg press about 250lbs & I could do curls & bench presses back in high school before I had my first heart attack (I was still in high school when I had my 1st one).
Those TV shows where they show people cutting up trees make it look so much easier than it actually is. Oak is particularly tough to cut.
Wish some of you guys were out in my area to get lumber from the trees that fell. Couple of decent sized oaks toppled over. So much wood going to waste.
And I buy firewood by cubic metre which there is about 5 or 6 sqm m to a truck load
https://ignitionfirewood.co.nz/south-auckland-firewood-4/NZ$200 equals about US$133
Here in the US we go by cords of wood. A cord is 4 ft by 4 ft by 8 ft. I'm guessing a cord of hardwood is around $200 to $225 here.
Zan, that's pretty fancy using Paint. I've never researched on how to use it. There's more tools than I thought.
I stopped by a local pawn shop today and bought me a new toy. I have a butterfly wrench but it's a cheap one and not very powerful. I'm trying to find information on this little bugger. It's just a 3/8 inch drive, and if I'm reading the serial number correctly,
137765, this was January 3rd 1977....... But I could be wrong.
I can't find any information on it. I'm curious how many pounds of torque it has. Being a small one, I'd guess 40 to 50ish
It's a Blue Point model AT300A. These were sold by Snap On.
I can find images online and even a rebuild kit, but no information as to the power output or care instructions such as oiling and greasing it.
The Habitat restore had a 10 to 150lb torque wrench. It's a no-name brand, just says Taiwan. Hey, it was only $7.... so I had to get it. I have a 50 to 250lb Proto and it's a lot longer. So this smaller one, if it's accurate, might be a nice replacement for my old twin beam one. The twin beams have a needle that points to the torque settings. This and my Photo are click types.
Zan, that's pretty fancy using Paint. I've never researched on how to use it. There's more tools than I thought.
I stopped by a local pawn shop today and bought me a new toy. I have a butterfly wrench but it's a cheap one and not very powerful. I'm trying to find information on this little bugger. It's just a 3/8 inch drive, and if I'm reading the serial number correctly,
137765, this was January 3rd 1977....... But I could be wrong.
I can't find any information on it. I'm curious how many pounds of torque it has. Being a small one, I'd guess 40 to 50ish
It's a Blue Point model AT300A. These were sold by Snap On.
I can find images online and even a rebuild kit, but no information as to the power output or care instructions such as oiling and greasing it.
The Habitat restore had a 10 to 150lb torque wrench. It's a no-name brand, just says Taiwan. Hey, it was only $7.... so I had to get it.
I have a 50 to 250lb Proto and it's a lot longer. So this smaller one, if it's accurate, might be a nice replacement for my old twin beam one. The twin beams have a needle that points to the torque settings. This and my Photo are click types.Attachments


Last edited:
Another one gone. I think he was the best.
https://www.nbcnews.com/news/world/...actor-who-served-tour-duty-james-bond-n922121
https://www.nbcnews.com/news/world/...actor-who-served-tour-duty-james-bond-n922121
He was the best Bond.
Double posted
We had a visitor I town today, well almost

Similar threads
- Replies
- 13
- Views
- 4K